
Annotate Pro
Annotate Pro makes it easy to create annotations on top of digital images or scans. They allow you to capture important information from each page for indexing and searching. Annotations can also be used to create hyperlinks within documents or to external resources. Annotations can be used on websites or in mobile applications to create hypertext documents from scanned archival material.
 Download
Supported OS: MacOS 10.13+
Annotation Pro Handbook.pdf
Getting Started
The initial browser window is separated into three panes: (1) the top left pane is used for navigating the folder hierarchy, (2) the right pane shows the images inside the currently selected folder, (3) the bottom left pane shows a larger preview of the selected image. Click an image in the right pane once to select it. Double-click an image to open it and to create or edit annotations.

After opening an image you can start annotating. In the image window, you can use the toolbar in the top right to navigate between images, zoom, select, move, and create annotations.
Tip: After opening an image, it is useful to select Show the Image List Drawer from the View menu (the image list drawer appears on the right in the above screenshot). This drawer lists all the images in that particular folder and allows you to easily navigate between them.
Drawing Annotations
There are a few things to keep in mind when drawing annotations:
- Always remember that annotation boxes might eventually become clickable buttons. This means that annotations should always be as large as possible without overlapping each other.
- Consider the goal of the annotation: to enter data for the purpose of indexing and searching or to be used as internal or external links. Keep in mind what will be most helpful to future users while annotating.
 Normally you use the rectangle tool (⌘4) to draw annotations. Place the mouse cursor on the page, hold down the left mouse button and drag to create a box. Then adjust the box’s size and position if necessary.
 The polygon tool (⌘5) can be used for drawing center lines and for outlining images that are too skewed to be captured with the rectangle tool or are irregularly shaped.
To select an annotation, click on it with the left mouse button. You can select multiple annotations by holding down the command key (⌘) while clicking on individual annotations to add them or remove them from the selected set. When the select tool (⌘1) is active, you can drag with the mouse to create a selection box around the desired annotations.
To move an annotation, simply drag it to a new position. You can also use the arrow keys to move or nudge selected annotations by small increments. To resize an annotation, drag one of the blue corner handles. To delete an annotation, select an annotation (or multiple annotations) and press the delete key (⌘←).
If you wish to annotate data that crosses a line break, create an annotation on the first line, and then duplicate the annotation (⌘D or hold down the alt key (⌥) while dragging the first annotation) and place the copy on the second line as shown below.

Note: In general, you should never create overlapping annotations. Drawing an annotation on top of other annotation is only permitted in certain situations that are specified in the handbook. For these situations, holding down the alt (⌥) and command (⌘) keys will allow you to start drawing an annotation on top of another one.
Drawing Gutter Lines
The polgyon tool can also be used to draw gutter lines. Gutter lines can be drawn on page spreads to mark the gutter where two pages meet. This line can be used to align and scale each successive page spread during page turning animations.
Using the polgyon, click once at the top middle point where the pages meet, and then right-click (or control (^) left-click) at the bottom middle point, creating a two-point line along the gutter of the page spread. Adjust the endpoints of the line if necessary.


Adjusting Annotations
Since annotations may eventually be turned into clickable buttons, it is important that the layout of the annotations on a page be as neat as possible and as regular as the underlying text permits.
The edges of multiple annotations can be aligned by first selecting them and then choosing one of the options from the Annotations > Align menu: align Left Edges (⌥⌘←), Centers, Right Edges (⌥⌘→), etc.
Multiple annotations can be resized to the same size by first selecting them and then choosing one of the options from the Annotations > Resize To menu: resize to Smallest Width (^⌘←), Smallest Height (^⌘↓), Smallest Width and Height, etc.
Annotations can be evenly distributed by first selecting them and then choosing one of the options from the Annotations > Distribute menu: horizontally (^⌥⌘→) or vertically (^⌥⌘↓).
Compare the following two pictures, the first after drawing the annotations, and the second after judicious use of the align and resize commands.

Tip: Learning the keyboard shortcuts for these commands is helpful as they will likely be used frequently. Almost all menu commands and toolbar buttons have keyboard shortcuts.
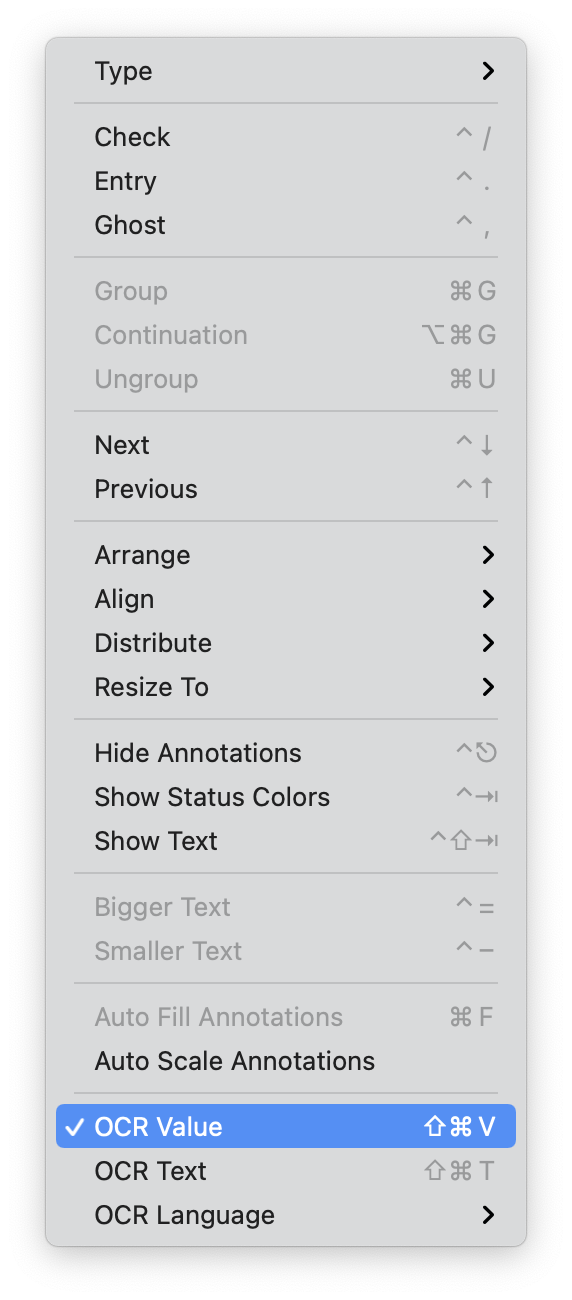
Contextual Menu
 Right clicking with the mouse on an annotation will display a pop-up contextual menu. This menu contains the most frequently used commands for editing and adjusting annotations.
Tip: To draw and type annotations quickly, place one hand on the keyboard over the A-S-D-F keys. Use the mouse to draw an annotation and then immediately press one of the shortcut keys listed above. When the Inspector Window (below) is hidden (⌘I toggles the visibility of the Inspector Window), the control key (^) does not need to be held down while assigning annotation types. Instead you can simply press the shortcut key by itself (e.g., press the D key after drawing an annotation in order to “type” it as a Date annotation).
Tip: Once all the annotations are drawn and assigned a type, align and resize them using both the mouse and the keyboard shortcuts. After this, you should not have to use the mouse again and can enter the metadata using only the keyboard as described below. By minimizing the switching back and forth between the mouse and keyboard, one can annotate much more quickly.
Inspector Window
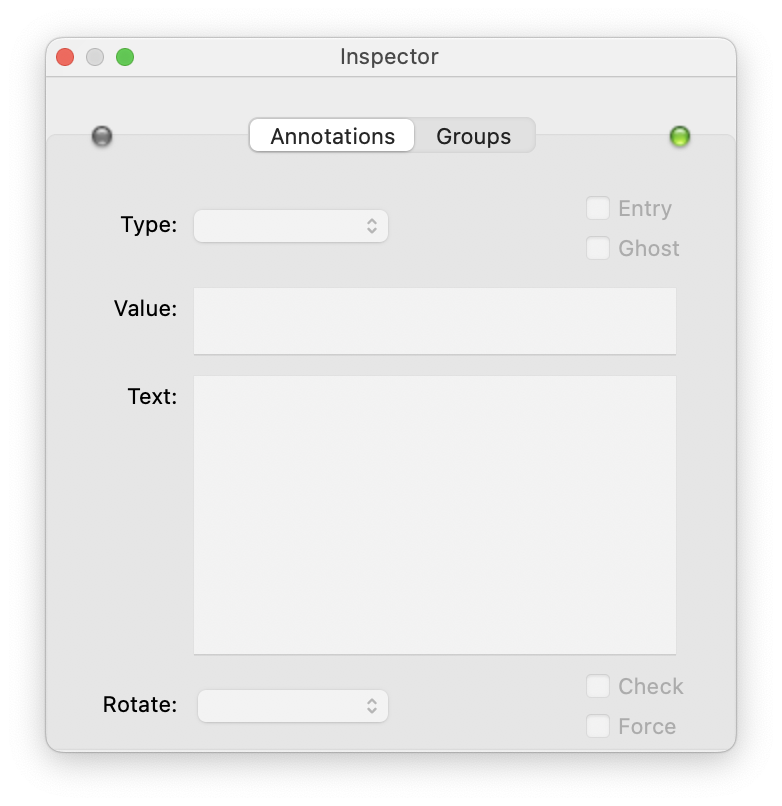 After drawing an annotation, the Inspector Window will open. This is where the data associated with an annotation box will be entered.
The Inspector Window is a floating window which can be placed anywhere on the screen. Selecting an annotation (or multiple annotations) while the Inspector Window is open (⌘I) will allow you to see, enter, or edit the metadata associated with the selected annotations. Indicator lights toward the top of the Inspector Window turn green when metadata is valid.
Most keyboard shortcuts are activated by pressing and holding one (or a combination) of the three modifier keys and then pressing another key at the same time. The three modifier keys are: the control key (^ or ctrl depending on the keyboard); the option key (⌥ or alt); and the command key (⌘ or or cmd). To learn the keyboard shortcuts, consult the menu bar at the top of the screen. Each command in a menu will have the associated keyboard shortcut listed next to the command name.
Annotation Types
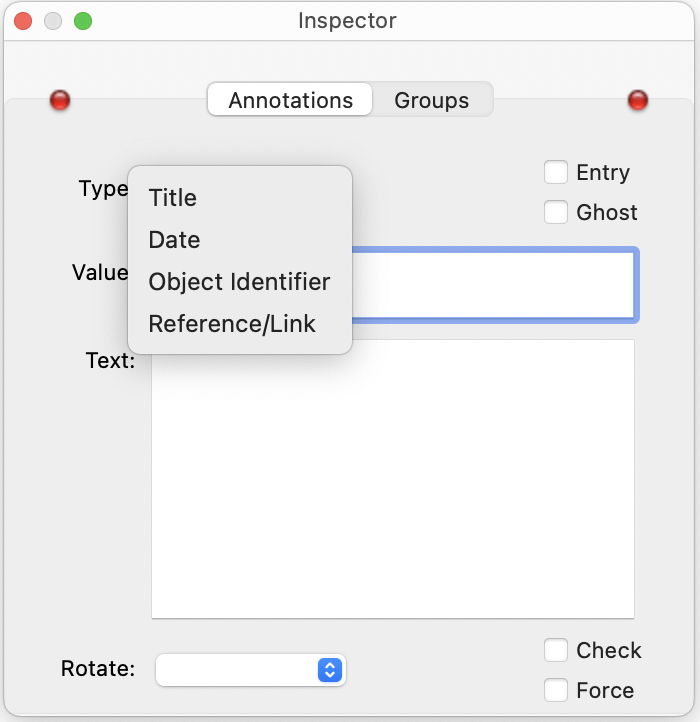 You can select the annotation type from a drop-down menu at the top of the Inspector Window. This indicates what type of metadata should be entered for a specific annotation. Users can edit the Annotate Pro configuration file and create as many annotation types as needed (although it is recommended to use as few annotation types as possible for clarity and ease of use).
Annotate Pro comes with a sample configuration file with four predefined annotation types: Title, Date, Object Identifier, and Reference/Link.
To learn how to edit and add annotation types, please see the section on Customization below.
Entering Metadata
After drawing an annotation and selecting the annotation type, enter the metadata in the Value and/or Text fields. In addition to typing the metadata into the appropriate fields you have the options of using Optical Character Recognition (OCR) or Dictation.
OCR
OCR will try to transcribe the text an annotation box is drawn over.
To begin using the OCR feature, first select the OCR Language to use from the Annotations menu at the top of the screen. The text created by the OCR feature can be inserted into the Value and/or Text fields by selecting OCR Value or OCR Text. Creating an annotation when one of these options is selected will perform the OCR function and automatically insert the text into the appropriate field(s).
Tip: The OCR engine works best on single lines of text. Selecting a paragraph usually works, but sometimes not. You can try to redraw the annotation with more or less margin around the text and usually it will produce a result. Pay close attention as the resulting text may need minor corrections.
Tip: OCR works better on typed text than handwritten text. If you are creating annotations for handwritten text, you may wish to turn OCR off.
Annotate Pro comes with English language OCR support. To add additional languages to the OCR function see the section on Customization.
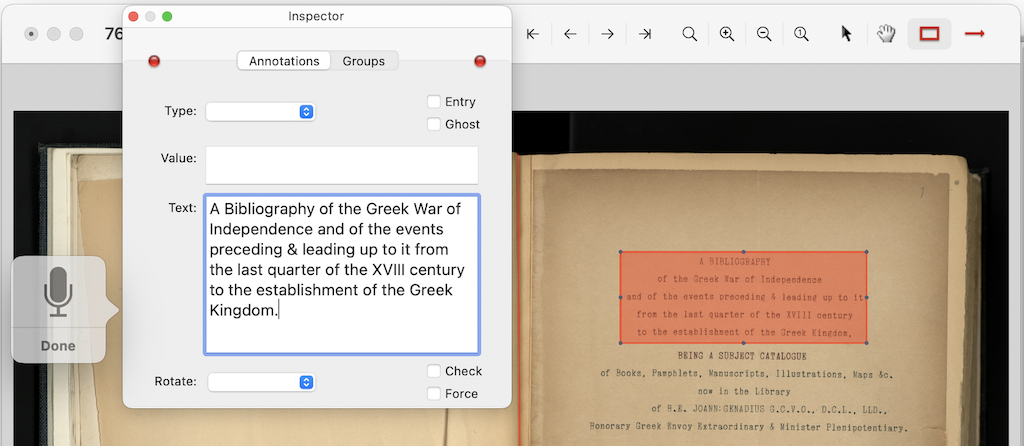
Dictation
Another option for entering metadata is Dictation. This can be useful when long passages of text need to be entered as metadata.
To enable Dictation, draw and select the appropriate annotation(s), click in the Value or Text field where the metadata should go, and navigate to the Edit menu at the top of the screen and select Start Dictation...
Tip: If dictation is enabled in the System Preferences, pressing the “hot key” key twice will enable dictation.
A microphone window will appear. Simply speak the text to be entered and click Done (or press the “hot key” twice) to end the dictation.
Value and Text Fields
 The Value field is best used for short pieces of data such as numbers, dates, grids, etc. You can create links between annotations inside a document by entering the same data in the Value field on two annotations and then checking the Entry checkbox on the destination annotation. When Annotate Pro exports PDFs, it will create a link from the nonentry annotation to the entry annotation (see the section on the Entry checkbox below).
The Text field is best used for longer pieces of information, such as descriptions of objects, drawings, photographs, etc.
Tip: To enter metadata quickly, select the top-left annotation on the page, open the Inspector Window by pressing ⌘I, if necessary, then start entering metadata into the appropriate fields. Use the tab key to move between fields in the Inspector Window, and the return key (^↓) to move to the next annotation box on the page. It’s possible to not have to use the mouse at all while entering metadata (the return key, however, will not move to the next annotation if the metadata in the current annotation is invalid (see below)).
Tip: Multiple annotations can be edited simultaneously. Once several annotations have been selected, enter or edit the metadata in the Inspector Window. This will set the same metadata on all the currently selected annotations. In general, the user should always try to be aware of what annotations are selected when editing metadata as this can erase previously entered metadata if the user is not careful.
Tip: If there are many annotations on a page with similar metadata (if there are several elevations on a page, for example, that all begin with 53.xxx meters), it might be more efficient to set up one annotation as a template (in this case an elevation annotation with “53.” as metadata) and then drag copies of this template to the appropriate positions on the page. Then when adding the metadata for the individual elevations, the user will only need to enter the missing part of the elevation.
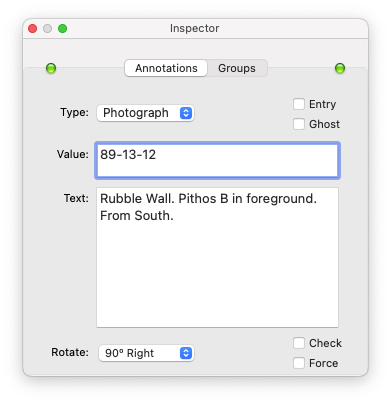
Rotate
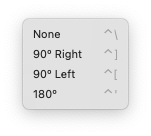 The Rotate drop-down menu within the Inspector Window can be used on annotations that correspond to drawings, graphs, or photographs that are rotated on the page relative to the rest of the content. By selecting one of the rotation options, the metadata will record how the associated annotation should be rotated. This information is useful when you want to crop annotated items out of original documents.
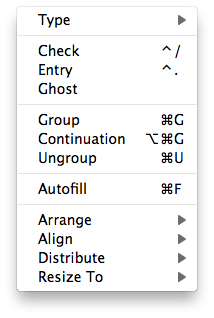
Entry, Ghost, Check, and Force
 There are several checkboxes inside the Inspector Window that are used for qualifying annotations.
The Entry checkbox (^.) is used to distinguish an entry from a reference. If two annotations are created with the same metadata in the Value field and one of them has Entry checked, in the final format the unchecked annotation (the reference) will be a link that takes the user to the entry. Annotations marked as an entry will be outlined in gray to distinguish them from simple references.
The Ghost checkbox (^,) is used when you don't want an annotation to appear in the final format. It should be checked when there is no actual text to annotate but you still want to record information on an image or scan. A ghosted annotation is also useful when multiple groups share a piece of metadata. Annotations can be duplicated into multiple groups without actually appearing in the final format. The positions of the ghosted annotations are not important since they will not be turned into clickable buttons (but they should not cover up any existing text). Ghosted annotation boxes will always display the metadata that has been entered.

The Check checkbox (^/) at the bottom of the Inspector Window should be checked whenever there is any doubt concerning an annotation or the metadata associated with it. These annotations will be colored differently (see below), making them easy for another user to find, check, and correct.
The Force checkbox can be used to override the validation checks for an annotation and force the annotation to be valid regardless of the metadata associated with it.
Annotation Validation
Metadata will be validated as it is entered based on the validation patterns defined in the configuration file (see Customization below). The Inspector Window has two small indicators in the top corners. The indicator in the top left corner shows whether the metadata for the currently selected annotation is valid (green) or invalid (red). The indicator in the top right corner shows the status of the entire page: If all annotations on a page have valid metadata (and are grouped), then this light will turn green, otherwise it will be red.
Annotation Color Modes
Annotations on a page are colored depending on which color mode the program is currently using. There are three color modes: normal, status, and text.
In Normal Mode annotations are colored by their type. In this example from the Athenian Agora, Grid = green, Elevation = brown, Lot = orange, Coin = blue, etc.

In Status Mode annotations are colored by their status (green = valid and grouped, yellow = valid but ungrouped, red = invalid, orange = check metadata). In this mode, annotation groups will also be outlined in green. The user can toggle between normal and status by pressing ^ tab.
Text Mode can be toggled on and off by pressing ^ shift tab. Annotation boxes are black and show the metadata text on top of the annotation boxes. A quick way to check the data is to repeatedly toggle text on and off and compare the text on the page with the metadata that has been entered.

Grouping Annotations
Select multiple annotations on a page that go together and then press ⌘G to group them.
Determining which annotations on a page go together can be difficult, and it helps to understand that annotation groups are fundamentally hints to the computer about which annotations belong together. They are never displayed to the end user.
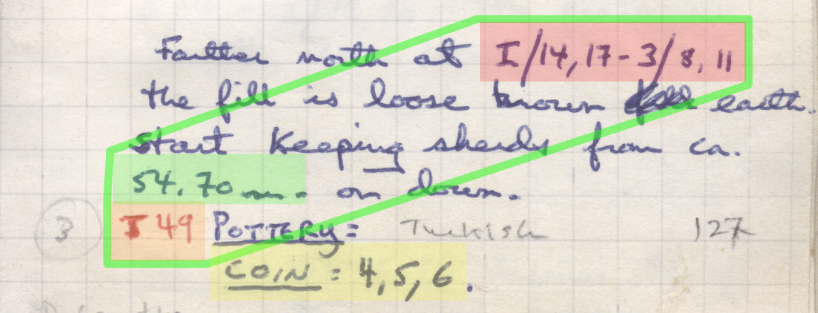
Tip: Easy groups to conceptualize are the Lot, Find, and Coin groups in the Pottery, Finds, and Coins notebooks from the Agora Excavations. Each group is simply all the annotations that make up one lot, find, or coin entry.
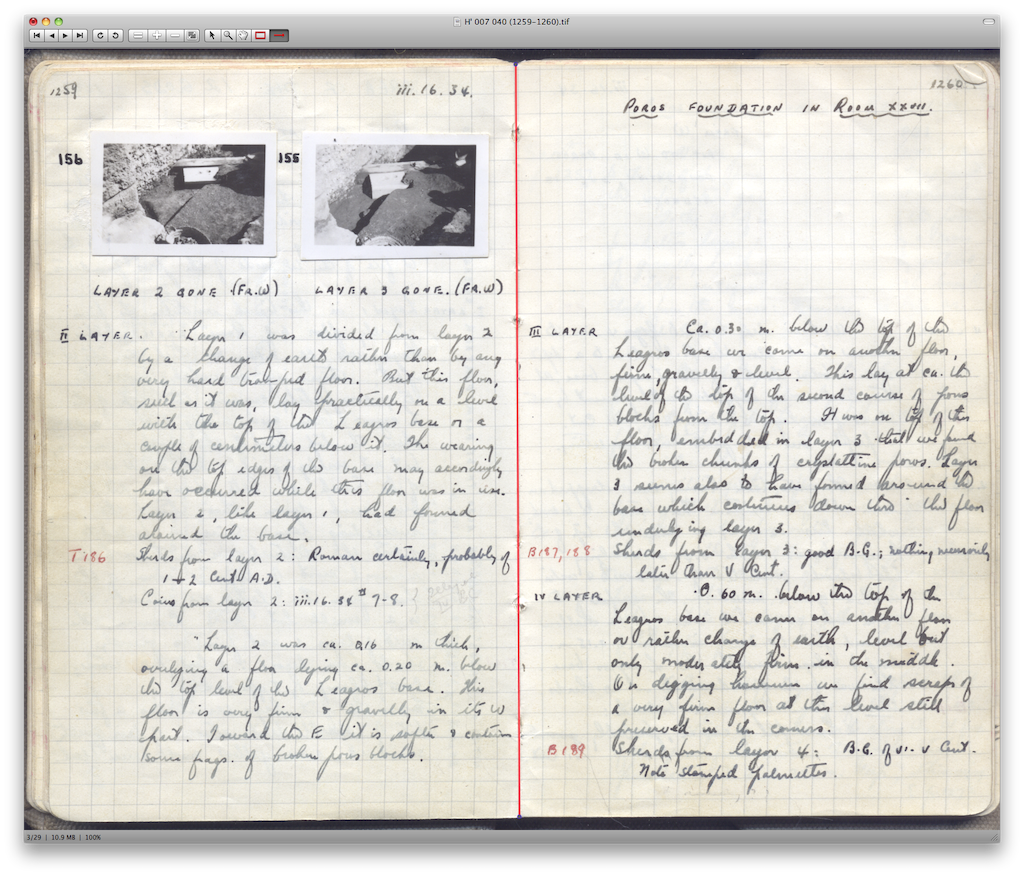
Plan and Cross-Section groups are also rather straightforward. They simply group the plan or cross-section annotation with the other annotations on that plan or cross-section (typically the whole page):

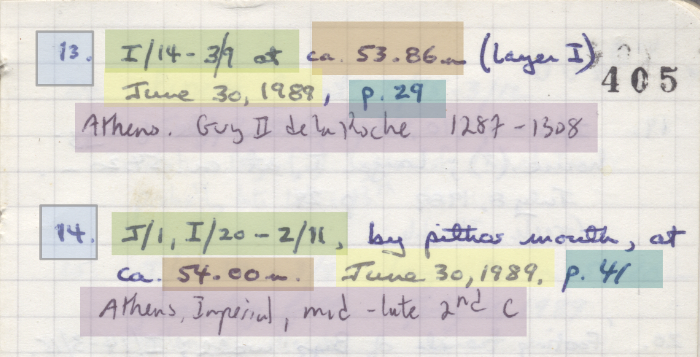
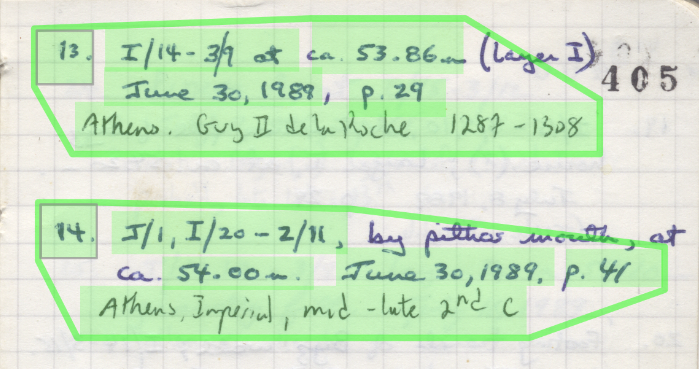
Photograph groups are similar. For example, a grouping for a photograph includes the annotations that go with the photograph such as grids, dates, and elevations (usually any annotations that are inside the photograph’s caption):

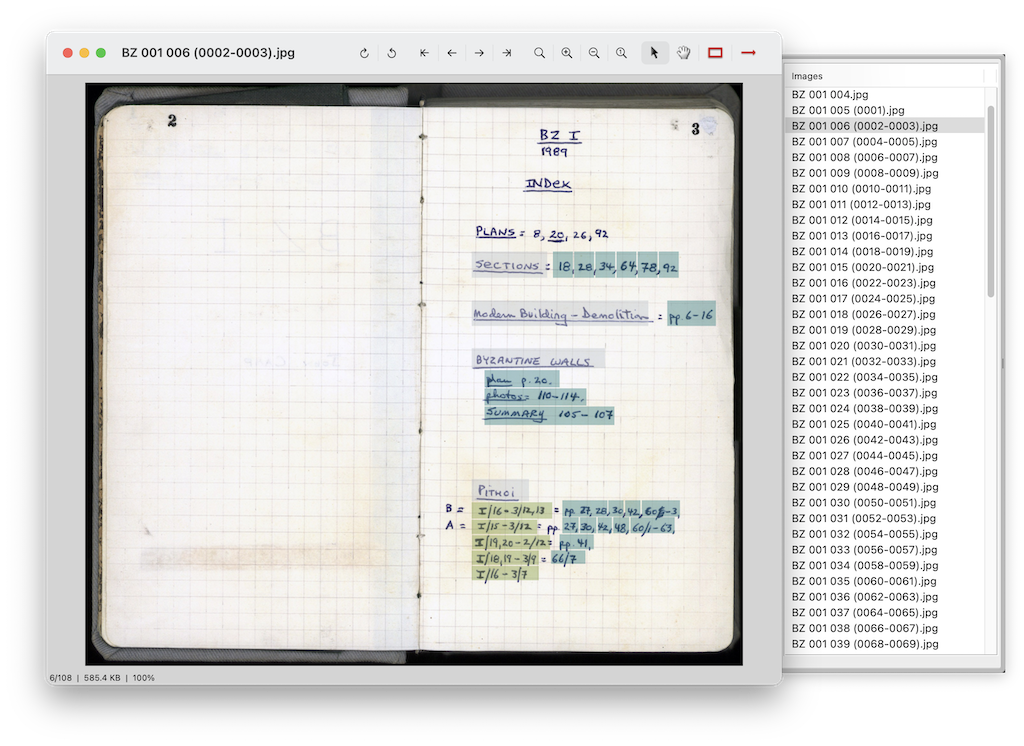
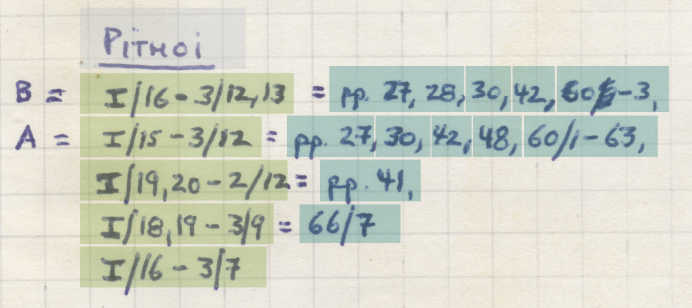
Index groups are thematic sections within an index. Note that an index can be difficult to group correctly. In the final interface, clicking on an index annotation will return a list of all the notebook pages that are inside that particular index group:

Grouping Principles
Switch to Status mode (^tab) when grouping annotations. The groups will be outlined in green. The user can also use the Groups tab in the Inspector Window to view and select any group (or annotations) on a page.
An annotation can only exist in one group at a time. If an annotation is grouped twice, it will simply leave the previous group and join the new one.
Annotations can be ungrouped by pressing ⌘U. Instead of ungrouping an annotation, it is usually easier to simply group it again with other annotations. It will automatically leave its previous group and join the new one.
An annotation can be grouped by itself. If an annotation does not go with any other annotations on the page, it can be grouped by itself. If an annotation, however, goes with several different groups on a page, then you need to decide whether to group the annotation by itself, or whether to ghost the annotation. In general, ghosting annotations into multiple groups should only be done when groups share important metadata and where the goal is to convert each group into a database record (this applies to the entries in the Finds, Coins, and Pottery notebooks, and to the Photograph groups in Notes). In most other situations it’s best to group this kind of “shared” annotation by itself.
If there are annotations at the top of a page that go with the last group from the previous page spread, then they should be grouped as a continuation (⌥⌘G). A continuation group is simply a group that continues from the previous page. A continuation will be treated the same as a group for that particular page but will eventually be merged with the last group of annotations on the previous page, specifically the group located at the bottom right of the previous page spread.
Tip: If annotations continue from a non-adjacent page spread, then these annotations should not be grouped as a continuation since the computer will not be able to intelligently resolve the page jump. For example, sometimes a context will be continued from many pages earlier in the notebook. Continuation groups only join groups across previous pages.
Every annotation on a page needs to be grouped before the page is marked as valid.
Importing and Exporting Annotations
It is possible to export and import annotations as CSV files.
Exporting
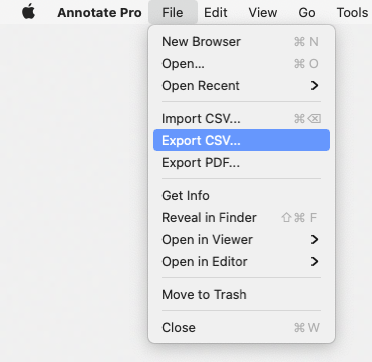
With the folder selected in the initial browser window, navigate to the File menu at the top of the screen and select Export CSV…
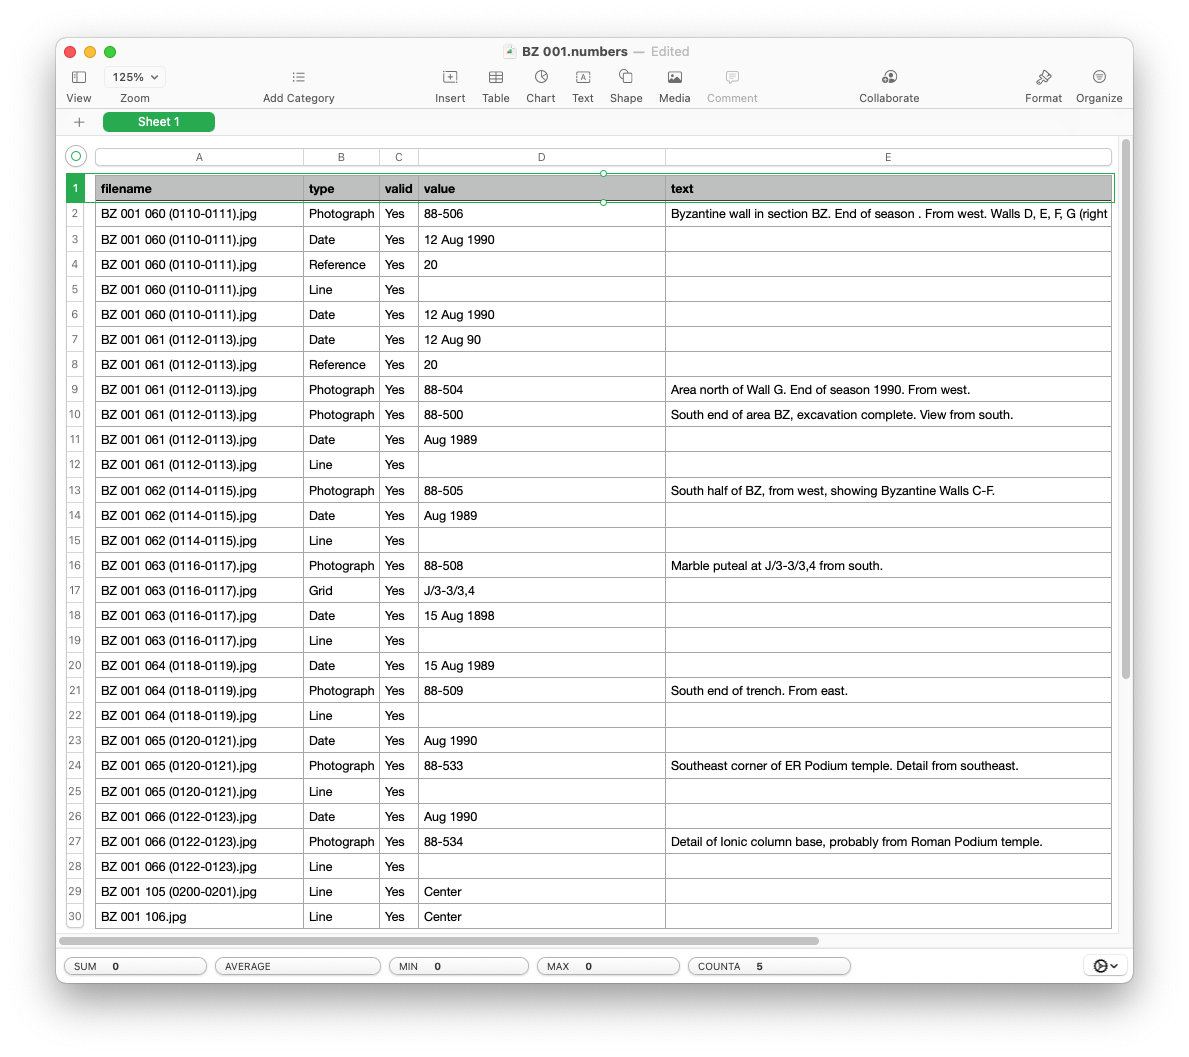
Choose a folder and the CSV file will be saved there. The annotation metadata can then be viewed or edited in Excel, Numbers, or imported into other database programs.
Importing
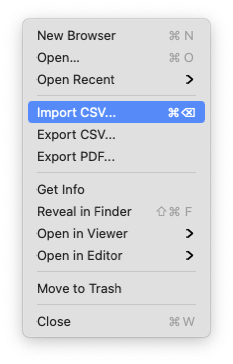
To import metadata into Annotate Pro, select a folder of images, navigate to the File menu, select Import CSV… from the drop-down menu, and then select the CSV file to import.
If the CSV file does not indicate where on the image annotations should be placed, they will be placed in the corners of the image. They can then be manually moved into their correct positions and resized.
Tip: Exporting, editing, and then importing metadata can be useful for making multiple changes quickly. By opening the CSV file in an external editor, commands such as Search and Replace can be used to quickly change metadata across the entire document, and to then be imported back into Annotate Pro.
For example, if a project wants to switch from the date “B.C.” to “B.C.E.,” a user could export all the annotations as a CSV file, open the file in Excel or Numbers, find and replace all occurrences of “B.C.” with “B.C.E.,” and then import the CSV file to change all the annotations in a document. Examining the table data in a CSV file is also a useful way to spot check data for any typos or irregularities.
It is also possible to create your own CSV file using the same column names as an exported CSV file. Custom CSV files must have either a “filename” or “path” column to identify the file where the annotations belong. If the size in the “size field” of the table does not match the size of the image on the disk, Annotate Pro will automatically scale the annotations.
Exporting to PDF
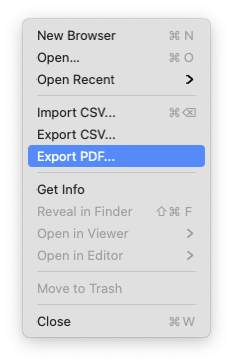
To export to PDF, select the folder in the initial browser window and navigate to the File menu at the top of the screen. Select Export PDF… and then choose a location where the file will be saved.
Tip: Annotated PDFs can be very useful for sharing documents, particularly those with Table of Contents and/or Indexes.
Customization
Annotate Pro can be customized to better fit the needs of specific projects. Annotation types can be edited, added, and removed and new OCR languages may be installed.
Considerations
To begin, assess what information on the images should be annotated. It will be important to decide how many categories of annotation types the project will require and what those types will be. These annotation types can be changed or updated as needed. If existing data is being imported into the program keep in mind the necessary annotation types for this data as well.
Adding and Editing Annotation Types
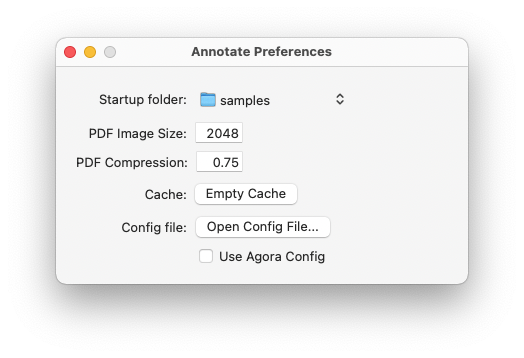
You have the ability to create and remove annotation types as needed. To do so, navigate to the Annotate Pro drop-down menu at the top of the screen and select Preferences. From there, select the button labeled Open Config File…
This will open a .txt file, in which new annotation types can be created and unwanted ones can be removed. To create a new annotation type, simply add the following fields with the desired customizations (in red) replaced as needed.
	type: TYPE NAME

	shortcut: KEYBOARD SHORTCUT KEY

	color: RGBA(0.957, 0.945, 0.290, 0.400)

	valid: /REGULAR EXPRESSION/

	entry: http://83.212.248.218:8991/F/?func=find-b&request=<<text>>&find_code=SYS
The type field will assign the name of the annotation type, shortcut determines the keyboard shortcut assigned to that type, color defines the RGB color of that annotation type on the page, and valid defines a “regular expression” that will be used to validate the metadata in the Value field. The fifth, entry, defines a URL template to use on entry annotations. When creating PDF files, Annotate Pro will substitute the <<value>> or <<text>> designation in the template with the metadata in the respective field, creating a link that will open the corresponding URL when clicked.
This pattern can be replicated for as many annotation types as desired. Delete any annotation types that are not desired.
Tip: Notes can be added to the configuration file as long as the row begins with a pound sign (#). This may be helpful if multiple users are editing the configuration file and need to leave each other notes.
Adding New OCR Languages
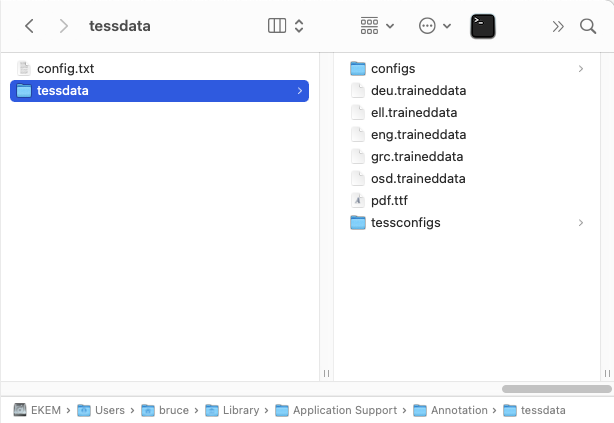
Additional OCR languages can be added to Annotate Pro by downloading "traineddata" files from the Tesseract website: https://github.com/tesseract-ocr/tessdata_best.
After downloading a language file, copy it into the Annotate Pro “tessdata” folder located at: /Users/<NAME>/Library/Application Support/Annotate/tessdata/
Example Projects
Below you will find several example projects that have been annotated with Annotate Pro. These projects will help you learn how to configure Annotate Pro to your project. The provided "config.txt" file includes all the necessary type definitions. Copy and paste the contents of this config.txt file into the Annotate Pro Preferences and navigate to one of the downloaded project folders to view the annotated images.

"config.txt" file

ΒΖ 001.zip
An annotated notebook from the Athenian Agora Excavations.
Handbook for annotating the Agora Notebooks.pdf
Agora 001.zip
An annotated publication on Portrait Sculpture
from the Athenian Agora Excavations.
0555.zip
An annotated notebook from the Corinthian Excavations.
0982.zip
An annotated notebook from the Corinthian Excavations.
BB768_13.zip
An annotated catalog from the Gennadius Library.
Acknowledgments
Annotate Pro was developed at the American School of Classical Studies in Athens and used to annotate 938 excavation field notebooks (197,600 pages) from the School’s excavations of the Athenian Agora. This project has been made possible thanks to the generous support of the Packard Humanities Institute, the Achelis & Bodman Foundation, and the Financial Mechanism of the European Economic Area 2004–2009 (EEA).